Showing posts with label homemade bread. Show all posts

Sunday, May 27, 2012

Happy Challah Days!

First things first, let me get the required verbiage in before I forget - again:

May’s Daring Bakers’ Challenge was pretty twisted – Ruth from The Crafts of Mommyhood challenged us to make challah! Using recipes from all over, and tips from “A Taste of Challah,” by Tamar Ansh, she encouraged us to bake beautifully braided breads.

Okay, that taken care of, this was my first attempt at challah.  We were supposed to make it in school, but somehow didn’t get to it.  Making the dough itself isn’t much different than making any other enriched bread dough.  However, because it’s a traditional Jewish bread, there are certain dietary rules to be kept in mind if you’re keeping your challah true to tradition.  This usually means no dairy in the bread.  Ruth provided some great information about the history of challah and what the different braids and shapes symbolize.  (She also included videos of braiding techniques which I tried to watch, but since my laptop doesn’t seem to like video I finally gave up in frustration.)  Of the recipes provided, I went with the Easy Challah mostly because it was a smaller quantity.  I do want to try the recipe for Honey White Challah at some point though.  It sounds really good and my braiding skills can use a lot more practice.

Tuesday, March 27, 2012

Daring Bakers: Dutch Crunch Bread

Until this month, I had never heard of Dutch Crunch Bread.  Living in small-town Southern Illinois, that’s not particularly surprising.  If not for the Daring Bakers’ Challenge, I’m doubt I ever would have heard of it.  Dutch Crunch is also known as tiger bread or giraffe bread because of the pattern of the crust after baking.  The “crunch” is actually a topping applied to the bread (any bread) and not the bread itself. 

Most of the bread I make is sourdough.  I considered other types of bread for this challenge as I wasn’t sure if sourdough would be a good match for the topping, but compromised by making a less tangy sourdough with a softer crust. 

Making sourdough bread has nearly become second nature to me.  Since the Tea & Cookies sourdough challenge in February, I’ve made sourdough bread at least once a week, sometimes twice if I’m giving bread to friends.  The recipe I use makes two loaves of bread.  Honestly, I wasn’t sure if I wanted to put this crunch topping on all of the bread.  What if I didn’t like it?  Why waste perfectly good bread if I didn’t like the "crunch"?

the Dutch Crunch topping
Although I’d only intended to make half of the topping recipe, I mistakenly measured the rice flour out for the full amount.  I chose to adjust all of the other ingredients to the full amount since it would be quicker than starting over.  Then I started to wonder if my active dry yeast was still good as I've forgotten how long I've had it.  (My sourdough bread doesn't use yeast, and I ordinarily use instant when I need it.) 

I'd say the yeast is still good.
Mixing up the topping didn’t do anything to reassure me that I would like it.  It smelled rather badly in my opinion – sweaty gym socks came to mind.  All I could think was, “please, please, please don’t let it taste like it smells!” and “maybe baking gets rid of the smell.”  But at least the yeast was still active. 

one topped, one waiting
The next step was to spread the smelly topping over the two small sourdough boules I was "sacrificing" for the cause.  The instructions indicated to err on the side of too much topping versus too little.  I spooned and spread the topping until I just couldn't stand to add any more. 

Once the bread was out of the oven and slightly cooled, the first thing I did was smell the crust.  While not as strong, it still smelled a little bit like sweaty gym socks to me.  I wasn’t looking forward to the second half of the challenge:  creating a sandwich using the bread. 
it is rather attractive bread
Tug had grilled chicken breasts for dinner the night before.  They were so large that neither of us finished them, so grilled chicken was part of my sandwich.  We also had a significant quantity of lettuce from our hydroponic garden that needed to be used.  Then I remembered some goat cheese I had bought and not opened yet.  And since I’m a big fan of goat cheese with citrus, my sandwich also included some of the preserved lemons I made earlier this month.  Tug had no desire to try my sandwich and made his own chicken sandwich.  I’ll admit, my sandwich isn’t for everyone.

It looks like a Dagwood, but I smashed it down to size.
And in all honesty, Dutch Crunch Bread really isn’t for me.  Eating it as part of my sandwich was fine, but at one point I pulled off a small piece of the “crunch” and ate it on its own.  It does taste like I think it smells!


Monday, February 27, 2012

More Sourdough

As much as I want to continue my attempts at perfecting French macarons, sheer economics dictates otherwise.  In my last attempt, I had come to the conclusion that my food processor simply can’t grind the almonds finely enough and that using purchased almond meal would be necessary.  However, at $11.65 per pound almond meal is rather pricey – much more so than the 25 pound bag of bread flour we recently purchased for under $7.00.  So.  Macarons on the back burner; bread on the front.

Yesterday I decided to try a new sourdough bread recipe from King Arthur Flour.  (I’m still using the starter from the Tea & Cookies sourdough challenge.)  After I printed the recipe for Rustic Sourdough Bread, I realized it was scarcely different from the Extra-Tangy Sourdough recipe I’ve been using.  Still, I wanted to bake bread yesterday and the Extra-Tangy requires overnight fermentation.  But then I had the idea to make both recipes and compare them.  The overnight fermentation of the Extra-Tangy is one of the differences between these recipes, another is that the Rustic Sourdough has added yeast.  I was curious as to how the yeast would make the final loaves different.  The mixing methods are slightly different also, but since I don’t follow the instructions very well anyway that wasn’t much of a consideration. 

Rustic Sourdough
The dough for the Rustic Sourdough was simple to make (dump all the ingredients together, mix, and knead) and was quite lovely in texture:  smooth, supple and very easy to handle.  It’s what my baking instructor would have called a “sexy dough”.  At the time I didn’t really understand what he meant by that.  I get it now.  That’s pretty much where my infatuation with the dough itself ends though.  The addition of the yeast apparently meant that so much as looking at the dough the wrong way caused it to deflate.  I still ended up with two nice loaves of bread.  The crust was crispy and the interior was chewy, yet tender, with a coarse crumb.  But it didn’t particularly taste like sourdough.  Good bread, just not good sourdough bread.

Extra-Tangy Sourdough
This was my fourth time making the Extra-Tangy Sourdough.  I’ve been very satisfied with the results of this recipe.  Although I did use a small amount (1/4 teaspoon) of citric acid in this batch, the starter has aged enough that I’m curious to know if it has developed a sour flavor that can stand on its own.  The next time I make this recipe (which may be later this week) I’m going to omit the citric acid.  I’m also going to try halving the recipe to make just one loaf.  Occasionally, two loaves is a little much for two people to eat within a reasonable amount of time.  Not to mention four.

The boule on the left was baked in the cast iron skillet;
the one on the right on the baking stone.

Because I don’t follow directions well, my method for the Extra-Tangy dough is to mix all of the flour, water and starter and then knead in the sugar, salt and citric acid.  This causes the dough to feel gritty at first and then dough gets very moist and tacky as the dry ingredients are being kneaded in.  It isn’t quite as appealing to the touch as the Rustic, but I prefer the results of this method versus how it's written in the recipe.  In addition to halving the recipe, I'm also going to try mixing all of the ingredients at once.  If I'm going to deviate I may as well go all out!  

Ordinarily, I bake my loaves on pre-heated baking stones, but this time I decided to try baking one of the loaves in a pre-heated cast iron skillet.  The loaf baked in the skillet browned more significantly on the bottom than the one baked on the stone.  And made it very difficult to peel the parchment off the bottom of the bread.  I believe I’ll stick to the baking stones. 

And as if four loaves of sourdough in two days wasn't enough, I decided today was also a good day to deal with the rapidly declining bananas sitting on the counter.  So while my sourdough loaves were rising, I made a loaf of chocolate banana bread.  But more on that tomorrow.


Tuesday, February 14, 2012

The Nontraditional Valentine

Since Tug is not a big fan of things sweet, it can be rather challenging finding a food-related Valentine’s Day gift.  (He doesn’t have such difficulties.  This morning I was greeted with a gift bag of Reese’s peanut butter cups, three Lindt chocolate bars – chocolate chile, dark chocolate sea salt and white chocolate coconut – and a bag of Lindt white chocolate truffles.)  There are the rare occasions when he’ll nibble on a small piece of dark chocolate, or eat a cookie or two, but they are indeed rare occasions.  I had thought about making brownies and cutting them into hearts, but he may have eaten one, two if I was lucky.  Instead, I made him something I know he really likes:  bread.  The man is an absolute carbohydrate junkie when it comes to bread.  

He was pretty happy with the focaccia I made last month, so that’s what I chose to make him for Valentine’s Day.  Baked in a heart-shaped pan of course.  And I made dinner.
focaccia baked in Wilton's (retired) puffed heart pan

Since I had all of those peanut butter cups though, I decided to make this recipe from Katie at Making Michael Pollan Proud.  When I first read it I nearly drooled on my keyboard.  For the most part I followed the recipe.  You know I have a problem in that regard.  What I did differently was use seven peanut butter cups (because I neurotically don’t like even numbers) and since I only had old-fashioned oats instead of rolled oats, I measured out one cup and gave them a buzz in the food processor then mixed them in with the other dry ingredients.  I find old-fashioned oats are just a little bit too toothsome in cookies.  The final thing I did differently was after mixing in the dry ingredients I switched to the dough hook attachment to mix in the chocolate chips and chopped peanut butter cups.  It worked like a charm to mix them in without crushing them.

After baking and cooling them, I boxed up almost all of them for Tug to take to work tomorrow.  These are so good that I have to get them out of the house.  Katie suggested that they freeze well so she freezes them to keep from eating them.  I have a feeling I would eat these frozen!
I couldn't resist pressing the last few scoops of dough into one of my
heart-shape cookie cutters.  Yes, I am a dork when it comes to Valentine's Day!

Friday, January 27, 2012

Sourdough Surplus

When I signed on for Tea & Cookies Cooking Challenge of sourdough bread with homemade starter, I had no idea how much starter I would end up with.  The reason I have so much starter is that unlike the instructions direct, I cannot bring myself to throw away portions of it.  So it just keeps multiplying. 

quantity of starter this morning

quantity of starter this afternoon
(the three half-pints are sitting in the dish in case of overflow)

Friends and neighbors beware.

Once I figured out that I was going to have more sourdough starter than any individual should ever need, the search for recipes using sourdough starter began.  Thus far, I’ve identified four recipes from the King Arthur Flour website to try:  sourdough chocolate cake, sourdough carrot cake, sourdough pizza crust and sourdough ciabatta.  (As my previous attempt at ciabatta didn’t work out as well as I would have liked, I thought it only fitting to include that one.)  In addition to these four, there will also be the upcoming sourdough bread recipe from the Tea & Cookies challenge.

Methinks I’m going to be more of a baker than a homemaker this coming week.  Thank goodness I have a patient and understanding husband!

Thursday, January 26, 2012

Almost Ciabatta and Experiments in Risotto No. 2

Today was yet another rainy, grey day in Southern Illinois.  It’s supposed to be sunny tomorrow and I am so hoping that will be the case.  But days too hideous to be outside are perfect for being in the kitchen.

Yesterday I had started a poolish to make ciabatta in another attempt at using up the previously noted bag of flour.  (A poolish is similar to a biga and other yeasty bread starters, but contains equal portions of flour and water.)  I was excited about making the ciabatta as it’s one of my favorite breads.  I’ve attempted it in the past with various levels of disappointing results.  Today was no different.

attempting to "fold" the dough

The dough for ciabatta is extremely soft in comparison to most other bread doughs.  Mine was too soft though, it was almost like a batter.  The fact that the humidity was 96% could have contributed, but ciabatta is one of those breads you just have to have a feel for the dough and whether or not it needs more flour.  I’ve not developed that feel yet. 
The loaves also probably should have been baked a few minutes more, but the cornmeal I had sprinkled on the baking sheets was beginning to scorch in the 465° oven and I wasn’t interested in filling my kitchen with the smell of the burnt cornmeal. 

Other than being pale, the crust has a decent crunch.  The interior was disappointing for as soft as the dough was, I was expecting a coarse texture with large holes.  Not so much.  It certainly doesn’t taste bad, but it’s not bread I would readily pay for.  I’ll spare you the recipe on that one until I’ve found one that’s near fool proof.

The second kitchen project was another risotto experiment.  This time instead of savory, I went the sweet route. 

very simple ingredients

Allow me to introduce you to Apple-Cinnamon Risotto.  This isn’t intended to be a side dish or even a dessert.  It is comfort food, plain and simple:  full throttle fat, calories and carbohydrates.  My initial thoughts of this were for something along the lines of a thick, but slightly soupy, rice pudding.  However, the rice just sucked up my last addition of liquid meant to contribute to the soupiness.  If rice pudding is more your style, I think serving it with some warm milk or cream for pouring would be just perfect.

it's quite possible that a spoonful
of mascarpone could make just
about anything better
 
As it turned out, I was perfectly happy with the scoop of mascarpone stirred in at the end.  I do think this risotto would be the perfect canvas for sweet arancini as well.  (Arancini are sort of the Italian version or rice croquettes.)  If I liked deep frying more than I do, I would wrap some of this risotto around a small dollop of caramel, roll them in some sweet bread crumbs and fry until golden and crispy.  And then probably make myself ill eating them.

I have a few more ideas for sweet risotto I hope to realize sooner than later.  Or as soon as I get that bag of flour used.

Apple-Cinnamon Risotto
2 cups unsweetened apple juice (mine was from frozen concentrate)
2 cups milk
2 Tbs unsalted butter
3/4 cup Arborio rice
1/4 tsp kosher salt
1/2 tsp cinnamon, or to taste
2 Tbs mascarpone

In separate measuring cups, heat the apple juice and milk in the microwave or in small pans on the stove top.  Do not mix them – the acids in the apple juice will curdle the milk.  Keep warm, but do not boil. 

Melt the butter in a large sauté pan over medium – medium low heat.  When the butter is fully melted and just beginning to bubble, add the rice.  Stir the rice to coat it completely in the butter.  Cook and stir until the outside of the rice is almost transparent and the inside still opaque. 

Add the about 1/3 cup of the apple juice, cook and stir until almost completely absorbed.  Add about 1/3 cup more of the apple juice.  Cook and stir the rice until the liquid is nearly absorbed, but don’t let the pan get dry.  Repeat the process until all of the apple juice is used, then begin adding the milk in 1/3 cup increments.  Keep adding liquid until the rice is fully cooked, but still has a slight firmness in bite. 

When the rice is fully cooked, stir in the salt and cinnamon.  Stir in the mascarpone and serve immediately.

Makes about 3 cups of risotto.

Tuesday, January 24, 2012

Focaccia

This post was actually supposed to happen yesterday.  But when I checked my biga yesterday, it was still the same lump of dough that hadn't risen one bit.  I couldn't figure out why.  I double checked my recipe conversions - they were spot on.  The only thing I could think of was perhaps it was the flour.  So for my second biga, I used some bread flour instead of the Italian 00 flour.  I peeked at it throughout the day yesterday check its progress.  It was working.  Sigh of relief.

ready to go into the oven
Although the recipe says the biga needs to ferment at least 18 hours, that doesn't have to be to the minute or even to the hour.  Mine went closer to 24 hours just because of the time I started it.  I don't mind getting up early, but I wasn't interested in getting up at 3:30 a.m. to start bread when I hadn't gone to bed until midnight.

Overall this is a relatively simple recipe and it doesn't require much in the way of special equipment, other than a scale as the recipe is by weight and not volume.  Since a lot of scales use 1/8 ounce increments instead of 1/10, I've also included gram weights as most scales usually have both standard and metric. 
fresh from the oven
I bake my focaccia in 10-inch round cake pans just because I like the shape.  (I may try a heart shaped pan for Valentine's Day.  Cheesy, I know, but Valentine's Day can be kind of cheesy in general.)  You can also just shape the dough on baking sheets.  It is a slack dough, however, so if you make two loaves instead of one large one, be sure to leave room in between. 

The next project will be ciabatta, but I'm also following along with Tea & Cookies Cooking Challenge of sourdough bread from homemade starter.

There are going to be a whole lotta carbs going on in this house!

Focaccia
Biga:
6.6 oz (188g) bread flour
3.6 oz (103g) water
1/16 tsp instant dry yeast

Mix the biga 18 hours in advance in a large container and allow to ferment.  It will be like a stiff dough.  Make sure that all of the flour is moistened.

Dough:
15 oz (424g) water
All of the biga
1.6 oz (47g) olive oil
1 lb, 5 oz (594g) Italian 00 flour or bread flour
0.1 oz (3g) instant dry yeast
0.5 oz (14g) salt
sea salt as needed
extra olive oil for containers and pans

In the bowl of a stand mixer fitted with a dough hook, add the water.  Tear the biga into small pieces and add to the bowl.  Mix on low speed (2 on a KitchenAid) for two minutes to break up the biga.
Add the olive oil, bread flour, yeast and salt.  Mix on low speed for four minutes; then on medium (4 on a KitchenAid) for two minutes.
Scrape the dough out into an oiled container at least twice the volume of the dough.  Cover loosely with a lid or plastic wrap and ferment (let rise) for 45 minutes.
Fold the dough on to itself and ferment 10 more minutes.
Scale the dough into 1-1/2 pound portions if making two loaves.
Place into oiled 10” round pans or on an oiled, rimmed baking sheet. 
Cover and ferment 15 minutes.
Preheat oven to 475°F.  Gently spread the dough if necessary.  Ferment 45 minutes.
Dip your fingers in olive oil and stipple the focaccia rounds.  Add sea salt and as desired.
Bake 18 to 20 minutes, until the tops are golden brown.
Remove from the pans to a wire rack and cool completely.

read to EAT!!

Sunday, January 22, 2012

A Bag of Flour

Have you ever purchased an ingredient with the best intentions of using it right away, only to lose it in the back of a cupboard, the refrigerator or the far recesses of the pantry?  This happens to me quite often, I ashamed to admit. 

Last week I discovered this bag of flour I purchased at Di Gregorio's Market in St. Louis. 

Although I wasn't worried about the flour "going bad", its best used by date was long gone.  So now I'm on a quest to use this entire 5 kg (11 lb) bag of flour. 

As quickly as I can. 

Last weekend I made homemade pizza using a no-knead crust recipe from King Arthur Flour and a sauce recipe from Tyler Florence.  (I didn't have any majoram on hand, so I substituted an equal amount of dried thyme.  I also added a pinch of ground chile.)  Overall I was pretty happy with that one, but the crust was a little more "bready" than I would have liked.  No photos of this one; they all looked fuzzy since the hot from the oven pizza steamed my camera lense.

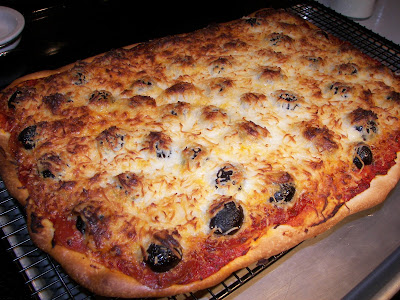
A mere six days later, I was trying another pizza recipe.  I wasn't worried about Tug being tired of pizza since I think he could eat pizza on a daily basis.  This time I used a different crust recipe to make a thin crust.  Had I followed the directions, I think I'd like this crust better.  Instead of making two pizzas, I chose to make one larger pizza and apparently didn't spread the dough thinly enough.  I'll definitely try it again and either roll the crust thinner or make two pizzas.

Before the next pizza attempt, or perhaps in between attempts, I'm going to take a stab at some different breads. 

This afternoon I started the biga (a pre-ferment) which has to sit at least 18 hours before I can use it to make focaccia.  Then I'm going to try my hand at ciabatta again.  My previous attempts at ciabatta haven't exactly met my expectations. 


And I'm thinking of making some more panettone, even though it's not Christmas Eve I think it will still taste as good.